Getting Started
Converting a jumpdoc is pretty straightforward once you get into a rhythm. Most documents take about a minute a page (sometimes less) once you're comfortable with the tooling. Here's the basic workflow:
- Upload the PDF: Find the jumpdoc you want to convert and drop the PDF into ChainMaker. The app will display it page by page and let you draw annotations over it.
- Fill out the basics: Before you start annotating, set up the jump's currencies, origin categories, budgets, stipends, and other structural details. This part takes a few minutes, but it's worth doing first since the app uses this information when you start placing perks and origins.
- Annotate the document: This is the bulk of the work. Draw a rectangle over a perk, item, drawback, origin, or anything else, and ChainMaker will try to automatically parse the title, description, and cost from the selected text. It gets this right most of the time, so the usual experience is: drag a box, glance to confirm it looks good, select an origin (if relevant), move on. The app doesn't always guess correctly though, especially with unusual formats or documents with lots of glyphs/ligatures, so a quick double-check is a good habit. Fixing a mistake is usually a two-second edit.
- Publish the document: Once you're happy with the conversion, publish it. You'll be prompted to choose a thumbnail and fill in any search-friendly metadata.
The rest of this guide covers the less routine parts of the process: handling purchases with user choices, duplicate perks with different cost tiers, capstone boosters, and so on. Most jumpdocs only need a handful of these techniques, and simple documents may not need any of them at all.
What Changes are Okay to Make?
It's important that your conversion stay very close to the original jumpdoc. There are two reasons for this: the first, is basic usability. A user shouldn't be surprised by what is added to their chain when they click a purchase in the document, and keeping as close as possible to the original text is the best way to ensure this. The second, is respect for the original jumpmaker; if you think you can improve on their work, feel free to create your own jump! But as long as their name is attached to the document you should adhere to their original intent as closely as possible.
There are a few exceptions to this guideline however:
- Minor spelling, grammar, and punctuation adjustments are allowed. This includes converting perk/item titles to title case, for consistency across jumpdocs. This also includes breaking large chunks of text into paragraphs.
- Rewording or restructuring purchases to incorporate features of the ChainMaker app that aren't available in static pdfs.
- The primary situation where this occurs is when a purchase offers a choice to the user at time of purchase. The general rule is that the text of a converted purchase should incorporate the choice the user made, and should NOT incorporate choices they didn't make, even if the AVAILABILITY of that choice was included in the original PDF. See below for more info.
- This includes explicit discussion of CP costs in most contexts other than companion imports. Since this information is already tracked by the app, this sort of discussion can (and should) be edited out.
- Similarly, capstone boosters have their effects on other perks applied automatically, and should be edited down to only the effect they have by themselves (or marked as temporary if their only effect is to boost other perks). See below for more info.
Configuring A Jumpdoc
Purchase Subtypes
Every jumpdoc starts with two purchase subtypes: Perks and Items. The most common reason to add additional subtypes is that the jump treats a category of purchases distinctly from perks and items, either organizationally or mechanically. Powers is by far the most frequently added subtype.
Purchase subtypes are also required if the jump uses stipends: allowances of CP assigned to a specific category of purchases. If a jump gives each origin a separate Powers budget, for example, you'll need a Powers subtype before you can configure those stipends.
Origin Categories
Before annotating any origins, you need to set up the jump's origin categories. These are the character sheet fields that origins populate: Age, Gender, Location, Origin, and whatever else the jump defines, such as race or species.
By default, a new jumpdoc comes with Age, Gender, Location, and Origin already created. Feel free to rename or repurpose any of them to match what the jump actually uses, and add new ones for anything the jump introduces.
Even if a jump doesn't mention Age or Gender as explicit mechanical choices, it's worth keeping those categories anyway. They're standard components of a jump, often assumed to exist by supplements and chain drawbacks, and cost nothing to leave in. If you don't attach them to an annotation on the pdf, they won't show up on the character sheet unless a user manually gives them a value.
There are two kinds of origin category: free-form and multiple choice. Setting up the categories themselves is a configuration step done before annotation. The individual origins within each category are then added through the normal annotation flow.
Both multiple-choice and free-form origin categories also support randomizers, and free-form categories support their own form of random generation. See Randomized Origins for details.
Free-Form Origin Categories
Free-form categories give the user a single editable line: a short word or phrase they fill in themselves. Age and Gender are almost always free-form, and Location can be too. These categories have little or no mechanical effect in most jumps, though you can still annotate prefilled entries with optional costs (for example, "Pay 50 CP choose your age").
A few things to keep in mind when annotating free-form origins:
- Annotations for free-form origins will often spatially overlap with each other and with other kinds of origins. This is expected and harmless. When a user clicks a region with multiple overlapping free-form annotations, the app prompts them to fill in all of them at once, which reflects how most jumps present this information anyway.
- The relevant text is often just one sentence inside a larger paragraph. It's fine (and usually recommended) to let the annotation cover the whole paragraph rather than trying to isolate that sentence precisely.
Some jumps charge a single fee to let the jumper edit both Age and Gender. When that's the case, combine them into a single "Age & Gender" category rather than creating two separate ones.
Multiple Choice Origin Categories
Multiple choice origins work like perks and items. You drag a rectangle over a region of the PDF and the app autofills a title, cost, and description for a single possible choice. Most jumps have at least one multiple choice category (often just called Origin), and many have several.
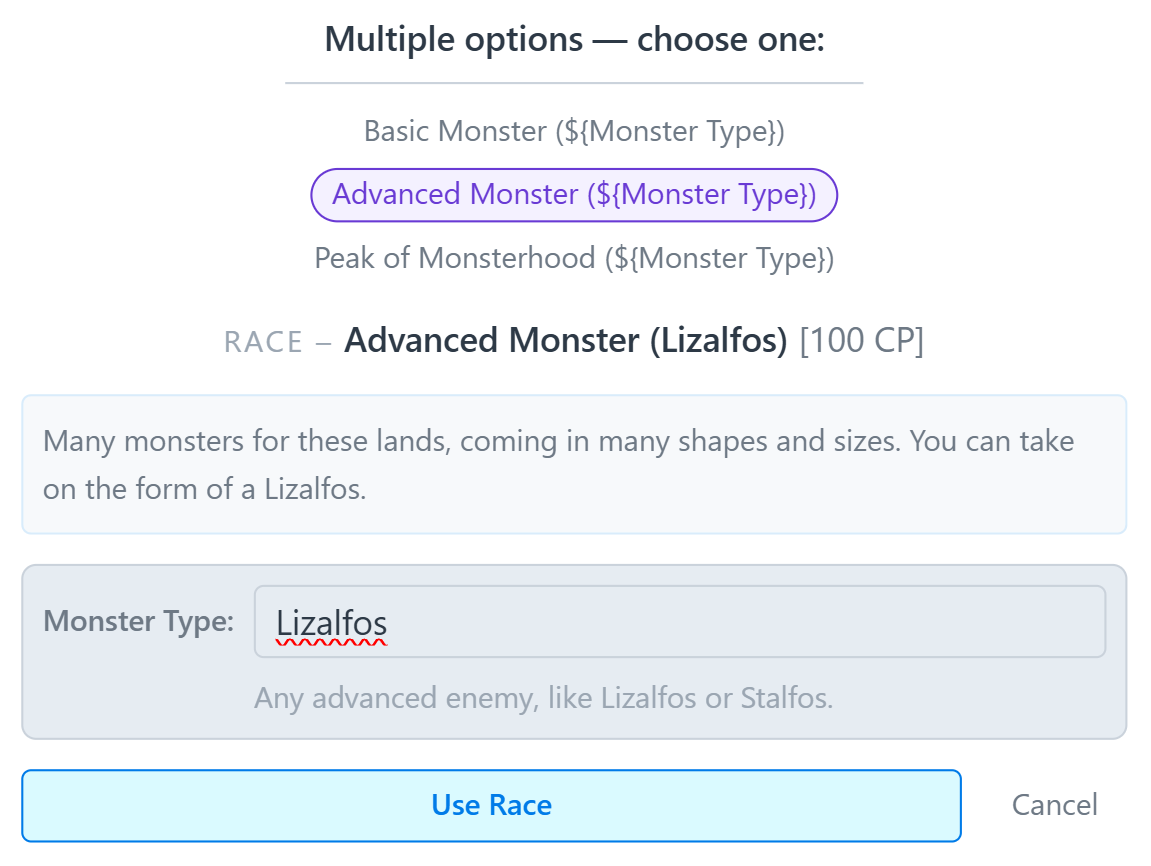
Many of the same tools available for customizing purchases apply here. For example, consider the Monster race in the The Legend of Zelda Series:
Monster [Free/100/200]
Many monsters roam these lands, coming in many shapes and sizes. For [Free], you can be any basic monster found in Hyrule, like a Bokoblin or Chuchu. For [100], you can take on the form of any advanced enemy, like Lizalfos or Stalfos. For [200], you are the very peak of monsterhood, like the destructive Lynels or Hinox. At this level, you could even be considered a boss amongst other monsters.
Using both tags and duplication, we can get a version of the race that looks like this to a user:
Handling User Choices
Oftentimes, a jump includes a purchase with multiple possible variations depending on user choice. For example, take a look at this perk from Generic Fantasy Otome Academy:
Basic Elemental Magic (100cp-300cp)
Not everyone has magic here, but it’s not all that rare among the nobility. The most typical magic is a moderate level of elemental magic - earth, fire, wind or water that you can conjure and direct. For 100cp you get one element at this level but you can purchase twice more, with each either adding a new element or multiplying your power in an existing element to double it (so quadrupling if you stack both purchases).
When picking this perk, the jumper has to make two choices:
- which element to select, and
- how many times to select that element.
If we just copy and paste this perk from the document, the jumper's perk list won't properly record these choices, and we may not even know how much to charge them! There are several tools available for handling situations like this.
Prompting for User Input
When a purchase offers a free-form choice, like a skill, element, or user-designed power, you probably want to give the user the opportunity to make that choice themselves. To do this, you can use tags in the purchase title and/or description by enclosing a word or phrase in ${} or $${}.
A single dollar sign gives the user the opportunity to enter a short word or phrase, while the double dollar sign allows them to enter an entire sentence or paragraph. If a purchase has a tag, we can also designate some of its description text as context for that choice.
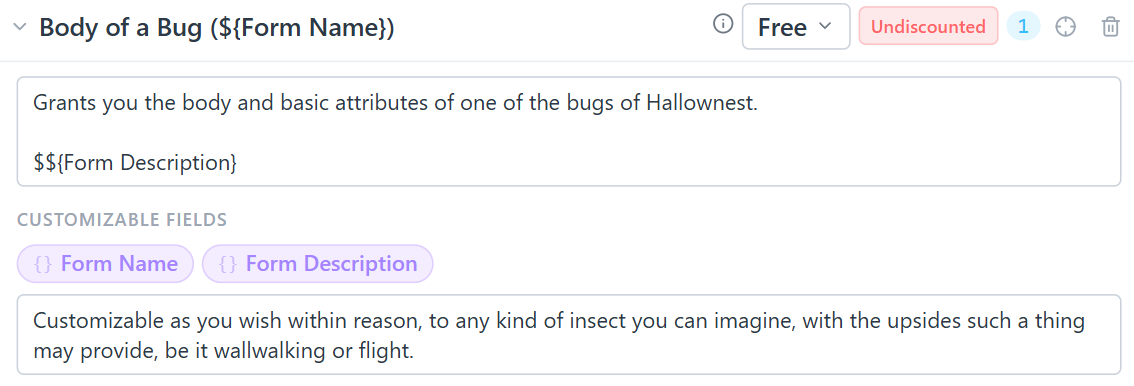
For example, consider this perk from Hollow Knight – Voidheart Edition:
Body of a Bug (Free):
Grants you the body and basic attributes of one of the bugs of Hallownest, customizable as you wish within reason, able to become any kind of insect you can imagine, with the upsides such a thing may provide, be it wallwalking or flight.
When converting it, we might render it as:
Note that most of the text of the perk is moved into the context. Indeed, once the perk is on a jumper's character sheet, they have no reason to care about how they could have chosen "any kind of insect they can imagine": the choice has already been made.
Text like this, that only matters when purchasing a perk and not once that perk has already been purchased, should be moved into context, with minimal rewording for grammatical consistency.
It's also good practice to put a tag in the title of the purchase, usually in parentheses, if the choice is a major component that should be visible at a glance.
Now, if a user selects this perk from the jumpdoc, they will be prompted to customize the text as appropriate:
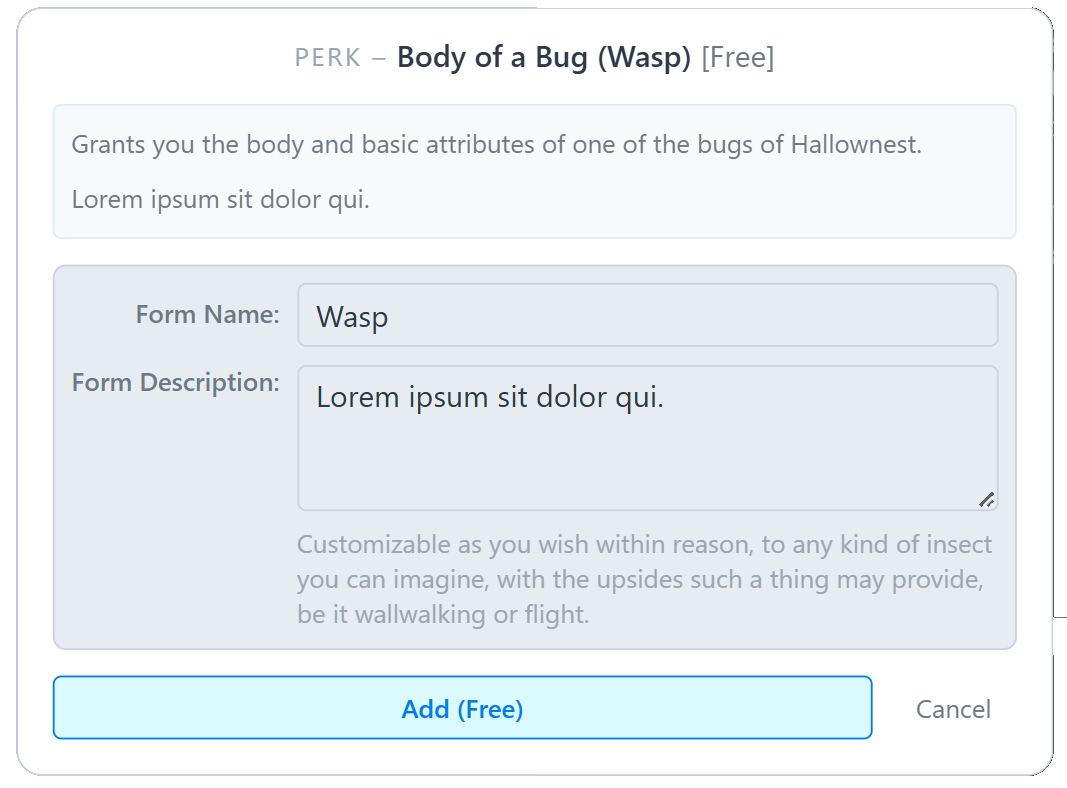
Tags can be added to perks and items, as well as drawbacks and origins. Exactly when to add tags, and how much to reword a purchase to accommodate them, is a matter of personal discretion.
Duplicating Purchases
When a user clicks on a region with multiple overlapping annotations, they will be offered a choice between the corresponding purchases. This behavior can be used to handle cases where a purchase has distinct versions, especially when those versions have different costs or large blocks of non-overlapping text that can't be moved into context for a tag.
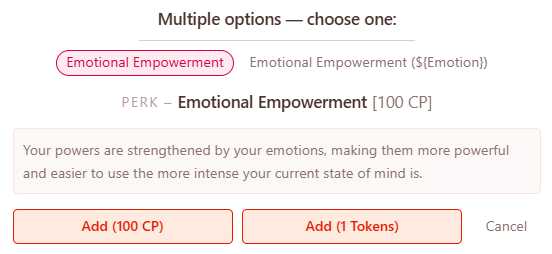
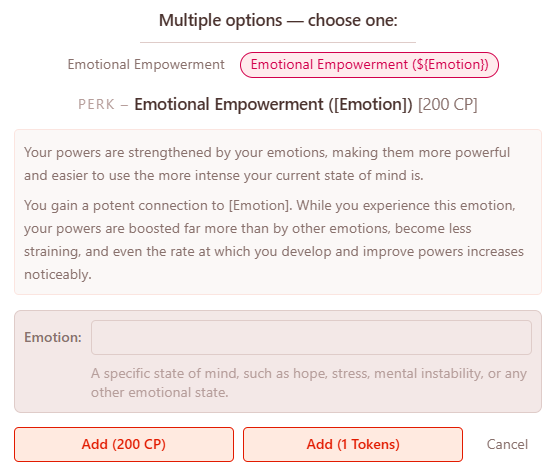
This is most common for perks and items that offer additional benefits for a premium cost, like this perk from Generic Psionics:
Emotional Empowerment (100 CP/200 CP)
Your powers are strengthened by your emotions, making them more powerful and easier to use the more intense your current state of mind is.
For an additional 100 CP, you gain a potent connection to a specific state of mind, such as hope, stress, mental instability, or any other emotional state. While you experience this emotion, your powers are boosted far more than by other emotions, become less straining, and even the rate at which you develop and improve powers increases noticeably.
We should implement this as two perks: one for the unenhanced 100 CP version, and one that includes the additional benefit.
We could attach both versions to the PDF region encompassing the entire perk, or we could have the 100 CP version span only the first paragraph while the 200 CP version spans both paragraphs.
We should NOT attach the 200 CP version only to the second paragraph, however, since that version of the perk still includes the benefits from the first paragraph.
Here's what the split perk would look like for a user:
We shouldn't be afraid to reword or restructure the descriptions of purchases split up in this way, especially if they use the common "You gain benefit A; for X additional CP, you gain benefit B instead of A" structure.
Indeed, we should avoid complicating the description of one version of a perk with text describing the benefits of another version, even if that means doing some minor rewording. You should also edit out any text that refers to the cost of the perk in CP.
Usually, it's recommended that you make perks split up in this way mutually exclusive by adding an incompatibility. This improves the smoothness of the user experience, but it's not disastrous if you forget.
Important Note: Always make sure that different versions of the same purchase have different titles. Usually, you can do this by adding a parenthetical to the title, though if in doubt you can always use the [title] I, [title] II, ... pattern.
Alternative Costs
Sometimes, a jumper is given more than one way to purchase the same perk or item.
If the benefits of the purchase depend on how it's purchased, you should duplicate the purchase to account for the two possibilities (see above). However, if both versions have identical content, the intended solution is to use an alternative cost.
The most common reasons for this are:
- the jump is "supermarket style," and the user can choose to pay for certain perks using tokens instead of CP, or
- the jump has multiple 100 CP perks available to each origin, but limits the jumper to one freebie.
In either of these cases, you should add an alternative cost, select "User Choice," and optionally select any prerequisite purchases or origins.
To keep track of limited freebies, you may either:
- create an extra "Freebie" currency with an allowance of 1, or
- simply give users the option of taking certain purchases for free (origin-gated as appropriate) and leave it up to them to make sure they don't accidentally double-dip.
For "supermarket style" jumps, there is an option to bulk add alternative costs to all perks/items, available in the rarely-used features tab of Jumpdoc Basics, which can reduce the tedium of clicking "add alt cost" on every perk and item in a jump.
Alternative costs can also be set to apply automatically.
This is mainly useful for jumps with more complicated discount structures than usual, such as those that discount purchases based on the perks one has acquired rather than just their origins, or jumps that offer the same purchase for free to one origin but only discounted to another.
Other Features
Combos & Capstone Boosters
Some purchases modify or enhance other purchases when both are present in a jumper's build, most commonly, capstone boosters that amplify the effects of a specific perk or set of perks.
To implement this, mark the boosting purchase as a combo provider in the jumpdoc editor. You can then add boosts to any other purchase: additional description that appears only when the capstone booster is also in the user's build. This keeps the base purchase description clean for users who haven't taken the booster, while still surfacing the enhanced version for those who have.
Recall from the top of this guide that the description of a capstone booster should be edited down to just their standalone effects, or marked as temporary if they have no standalone benefit at all.The combo text system is specifically designed to handle this: the booster purchase itself describes what it does on its own, and the enhanced description lives as combo text on the purchases it affects.
Similarly, there is usually no need to retain "you gain X additional benefit due to holding capstone booster Y" style text in the boost description; expressions of this sort should be edited down to simply "you gain X", since the app already keeps track of the prerequisites.
Randomized Origins
Both kinds of origin category support randomization, though they work differently.
Randomizers can have their own cost (often a negative one), since many jumps give the jumper a small CP bonus for rolling randomly rather than choosing. Whichever origin the randomizer lands on, the user does not pay that origin's normal cost on top of the randomizer cost.
Multiple Choice Randomizers
A multiple choice origin category can have a randomizer, which selects one of the category's existing options at random and applies it to the user without charging the normal cost. This is the standard way to implement "roll randomly for your location, or pay to choose from the list" mechanics, which appear in a large number of jumpdocs.
Free-Form Randomizers
Free-form categories support a more flexible kind of randomization. Rather than picking from a fixed list, a free-form randomizer generates a value by filling in a template string. Two placeholder types are available:
${n-m}: generates a random integer between n and m (inclusive). For example,${18-36}might produce24.${A|B|C}: picks one of the listed options at random. For example,${Man|Woman}produces eitherManorWoman.
These can be combined freely in a single template. For example, ${18-36} Year-Old ${Man|Woman} might produce "27 Year-Old Woman". This makes it straightforward to implement "generate a random age and gender" mechanics that some jumps include, without needing to enumerate every possibility as a separate option.
Scenario Outcomes & Rewards
Scenario rewards in ChainMaker can take three forms: currency (a flat CP grant), stipends (a per-subtype allowance), or perks/items (specific purchases added to the jumper's build).
Many jumpdocs don't give explicit names or descriptions to scenario rewards, which are often incorporated into the scenario text in a less structured manner than direct purchases. When converting these, use your own discretion to come up with appropriate titles that capture the intent of the reward, and adjust the wording of the description as need be.
If a scenario has multiple distinct outcomes with different rewards, you can divide the rewards between Outcome entries. Each outcome can have its own name and description. If there is only one possible outcome, you can leave the outcome name and description blank.
Once rewards are entered as structured data, the scenario description itself should be trimmed to remove reward text: it's redundant with what the app already displays, and keeping it in makes the description harder to read.